Think of a Docker container as a lightweight virtual machine.
By using a text file named Dockerfile, you can describe everything this lightweight virtual machine should contain.
From this Dockerfile, you can build what is called an image.
And from that image, instantiate or run one or more containers.
Oracle provides a GitHub repository that contains configurations, images, and Dockerfiles for Oracle products.
There are Dockerfiles for most versions of the Oracle database and if you’re using an Intel Mac (not ARM support right now) or Linux, this repo also offers a script for building a Docker image with any version of the Oracle database.
So, assuming you have Docker installed, start by cloning the repo (or download it as a ZIP file):
git clone https://github.com/oracle/docker-imagesIt’s a big repository, so if you have Git version 2.22 or above, you can use sparse checkout to only download the directory that contains the files for the Oracle database:
#1. Check if you have Git 2.22 or above, otherwise update it first
git --version

#2. Clone the empty repo
git clone --no-checkout https://github.com/oracle/docker-images

#3. Cd into the empty repo
cd docker-images

#4. Update the config file to enable sparse checkout
git config core.sparseCheckout true

#5. Initialize sparse-checkout
git sparse-checkout init --cone

#6. Checkout the Oracle database directory
git sparse-checkout set OracleDatabase/SingleInstance
In any case, the next thing you have to do is decide what version of the Oracle database you want to use and download the corresponding Linux installation ZIP file from the official Oracle download page.
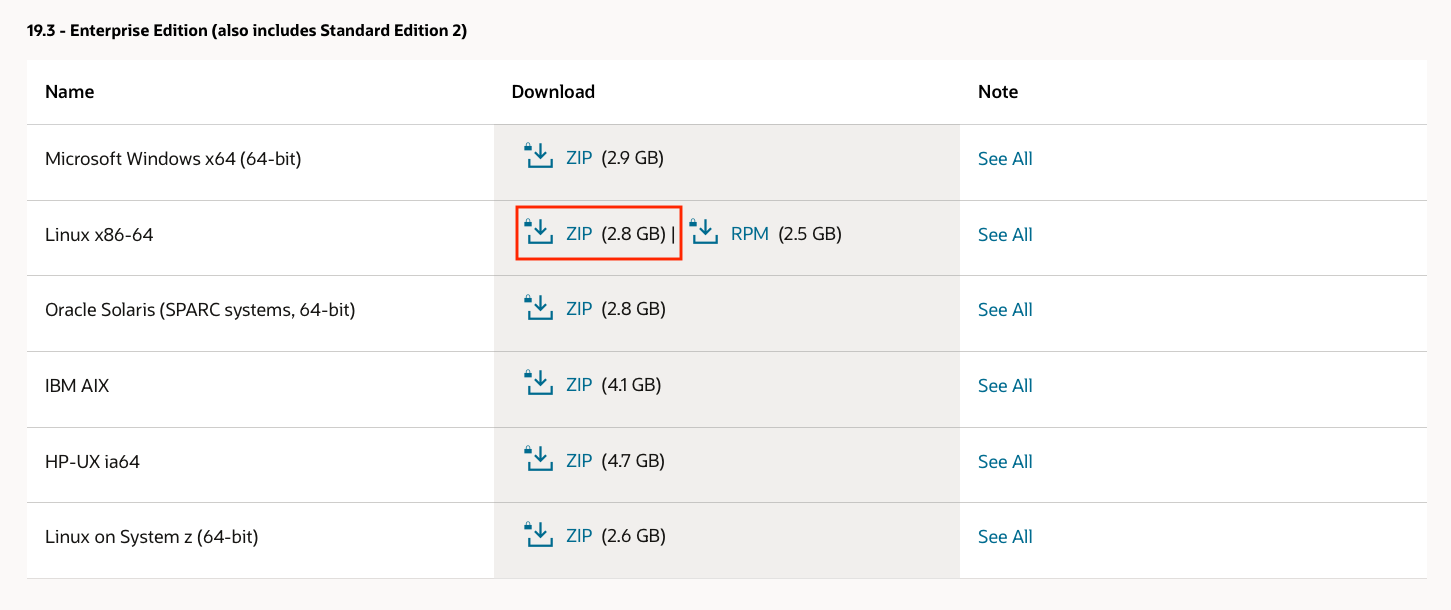
Once you’ve downloaded the file, move it to the directory of the corresponding dockerfile (don’t unzip it). For example, if you downloaded the installation file for Oracle 19.3, place it in the directory dockerfiles/19.3.0/:

Now run the buildContainerImage.sh script with the -h flag to see all the options you can use to build the Docker image:
./buildContainerImage.sh -hFor example, to build an image for Oracle 19.3 standard edition run the following command:
./buildContainerImage.sh -v 19.3.0 -s By default, the script builds a slim image, without components needed for patching extension support. If you don’t want this, use the build argument SLIMMING=false with the -o flag:
./buildContainerImage.sh -v 19.3.0 -s -o '--build-arg SLIMMING=false'The script will create an image of around 5-7 GB and it’ll take more than 10 minutes to finish.
After that, you can check the image in your local Docker repository with the command:
docker imagesBy default, the image will have the name oracle/database and the version (e.g. 19.3.0-se2) as its tag. You can change this with the flag -t. For example:
./buildContainerImage.sh -v 19.3.0 -s -t my_image_name:my_optional_tagOnce you have an image, you can create a container for that image to execute the Oracle database.
Here you can see all the options you can pass to the container.
Take for example the following command:
docker run \
-it --rm --name oracledb \
-p 1521:1521 -p 5500:5500 \
-e ORACLE_PWD=My1passw \
-v ${PWD}:/opt/oracle/oradata \
oracle/database:19.3.0-se2
Let’s explain it line by line.
docker run is the Docker command that creates and runs a container from an image.
-it --rm --name oracledb makes the container with the name oracledb run in interactive mode (in the foreground). --rm indicates that when the container is killed, it will be also removed from our local repository (otherwise, it will remain in the repository with an exit state).
-p 1521:1521 -p 5500:5500 exposes the container port 1521 and 5500 to the same ports on the host so they can be used outside the container.
-e ORACLE_PWD=My1passw creates the environment variable ORACLE_PWD inside the container, which will be used as the password of the SYS, SYSTEM, and PDB_ADMIN accounts. The variable is only used the first time the container is run. Subsequent executions of the docker run command don’t take into account this variable. If you don’t pass this variable the first time, a default password will be auto-generated (and shown on the screen). The password can be changed later, while the container is running, with the command:
docker exec [container_name] /opt/oracle/setPassword.sh [new_password]-v ${PWD}:/opt/oracle/oradata mounts the container directory /opt/oracle/oradata to the current directory, represented by ${PWD} (of course, you can specify any directory). If you omit this instruction, the data will not be persisted and the database will be recreated every time the container starts, so be sure to use it and always point to the same directory.
Finally, after all the options, oracle/database:19.3.0-se2 specifies the name of the image that the container will use.
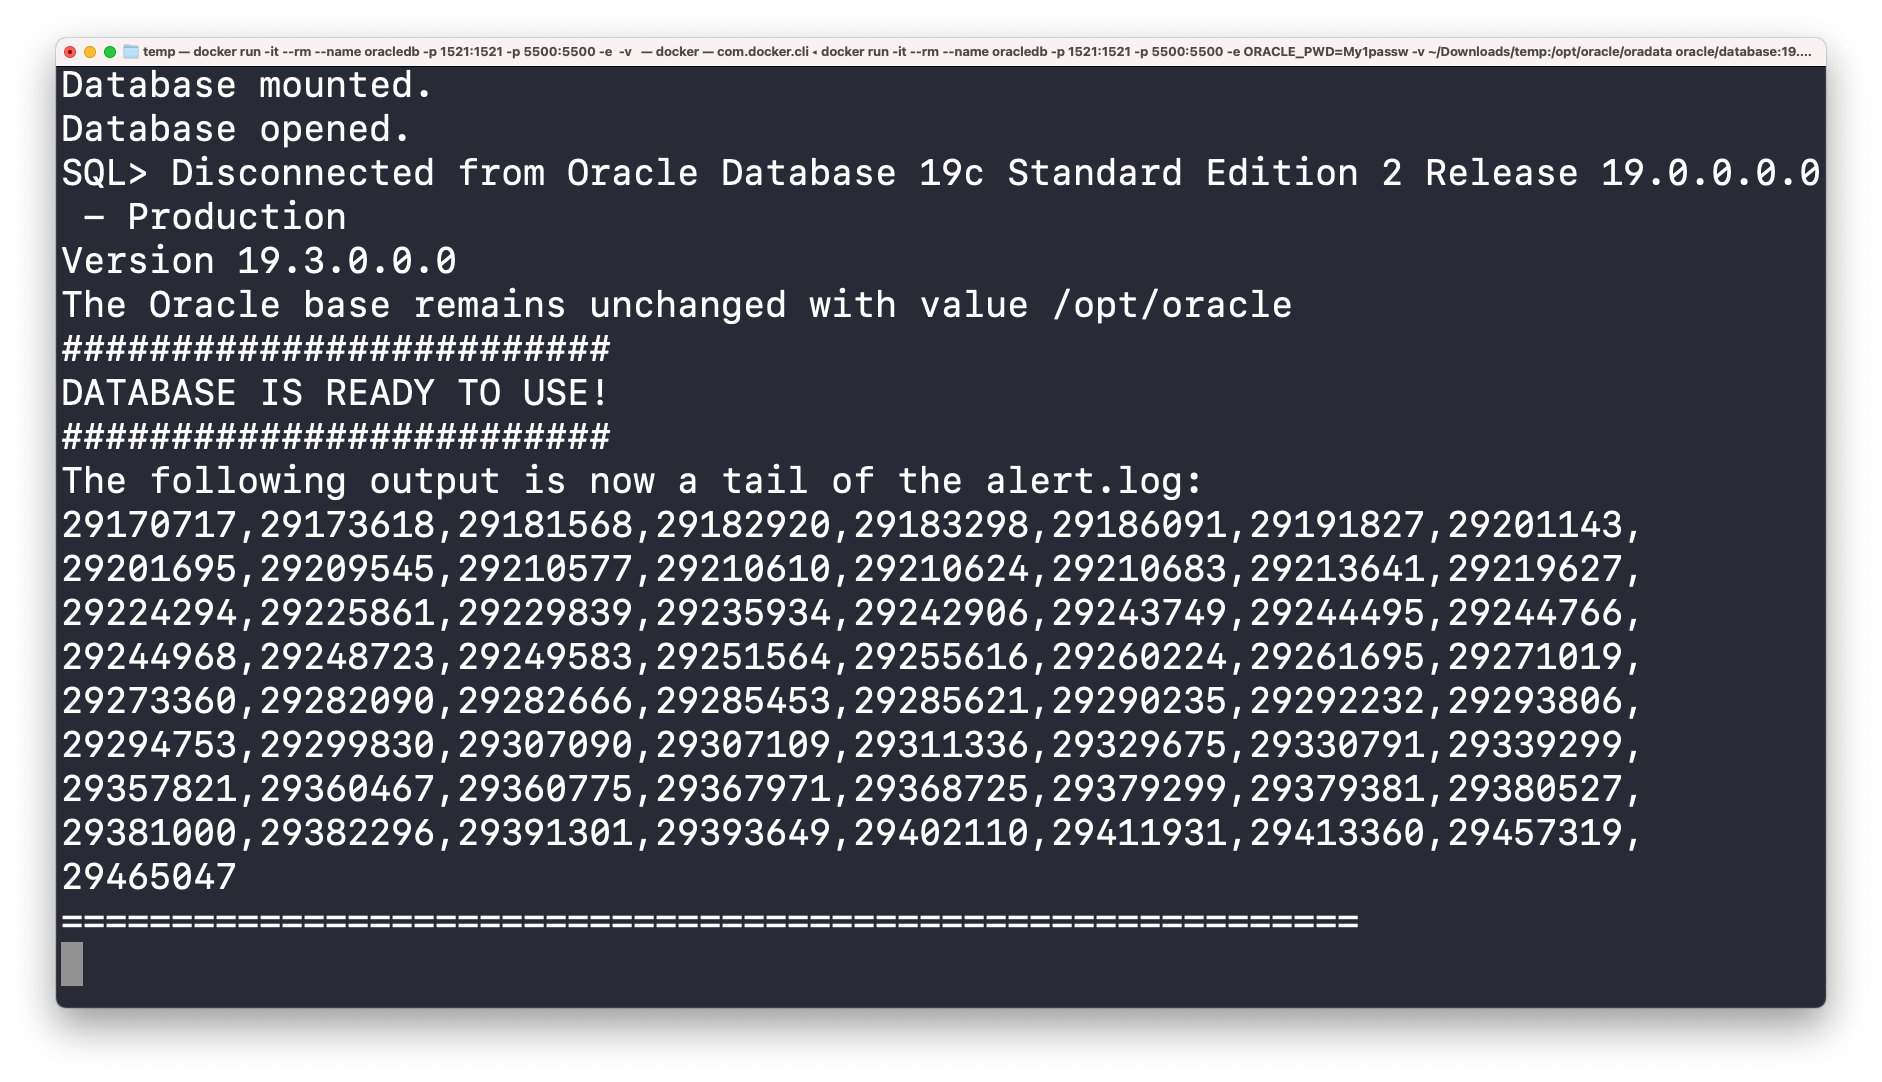
The process of creating the database will take between 10 and 20 minutes, you just have to wait for the message DATABASE IS READY TO USE!:
Using SQL Developer or any other similar tool, you can now connect to the database. Or use Oracle Enterprise Manager Express at https://localhost:5500/em/.
And remember the directory where /opt/oracle/oradata is mounted?
In that directory, you can find the tnsnames.ora file ([ORADATA_DIRECTORY]/dbconfig/ORCLCDB/tnsnames.ora):
ORCLCDB=localhost:1521/ORCLCDB
ORCLPDB1=
(DESCRIPTION =
  (ADDRESS = (PROTOCOL = TCP)(HOST = 0.0.0.0)(PORT = 1521))
  (CONNECT_DATA =
    (SERVER = DEDICATED)
    (SERVICE_NAME = ORCLPDB1)
  )
)
As you can see, there are entries for the container database and one pluggable database.
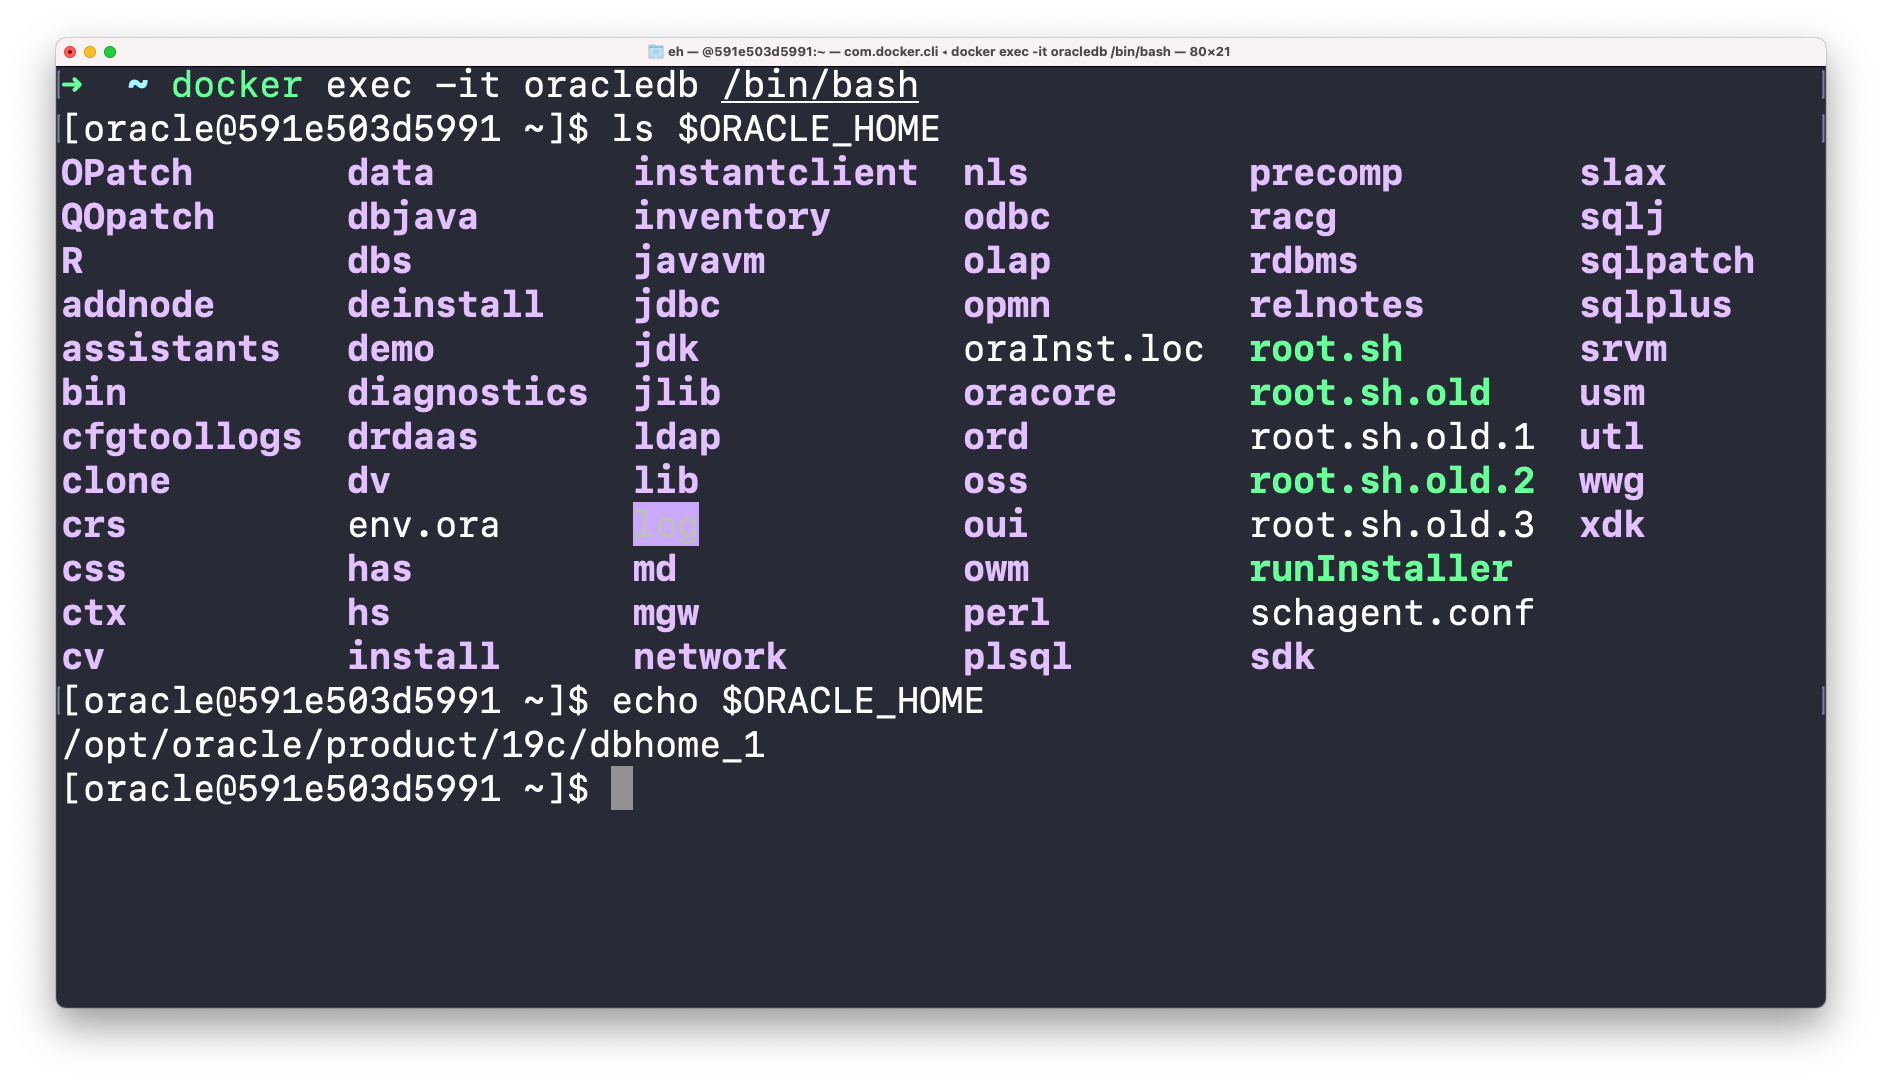
You can connect the container with the command (make sure the container is running):
docker exec -it [container_name] /bin/bashOnce you’re inside the container, you can navigate through the filesystem to see what it contains. The environment variable $ORACLE_HOME represents the Oracle home directory (/opt/oracle/product/19c/dbhome_1):
Or you can connect to the database using SQL Plus:
sqlplus sys@ORCLCDB as sysdbaSo there you have it.
Check out the README file of the repo for more options and the FAQ for more information.