What you will learn
In this tutorial, you will learn how to create a web application using Spark (the web microframework, not Apache Spark) and Freemarker on the view layer, Spring for dependency injection and data access, and HSQLDB as the database.
Particularly, you’ll learn:
- How to structure a Web application with Spark
- How to handle post requests with Spark
- How to create a master template in Freemarker
- How to integrate Spring with Spark
- How to use HSQLBD as an in-memory database
Among other things. So let’s get started.
What’s in a name?
The application we’re going to build for this tutorial is a mini clone of Twitter.
Why mini?
To keep things simple, we’ll only implement the following functionality:
- Log in / Log out
- Registration
- User’s timeline / Public timeline
- Follow / Unfollow
There won’t be any:
- Favorites
- Retweets
- Direct messages
- Notifications
- Recommendations
And all the other things that are the reason we have come to love Twitter.
All of this work (including the name) is based on the minitwit example for the Flask Python web microframework written by Armin Ronacher.
minitwit
Here are some screenshots of the application:
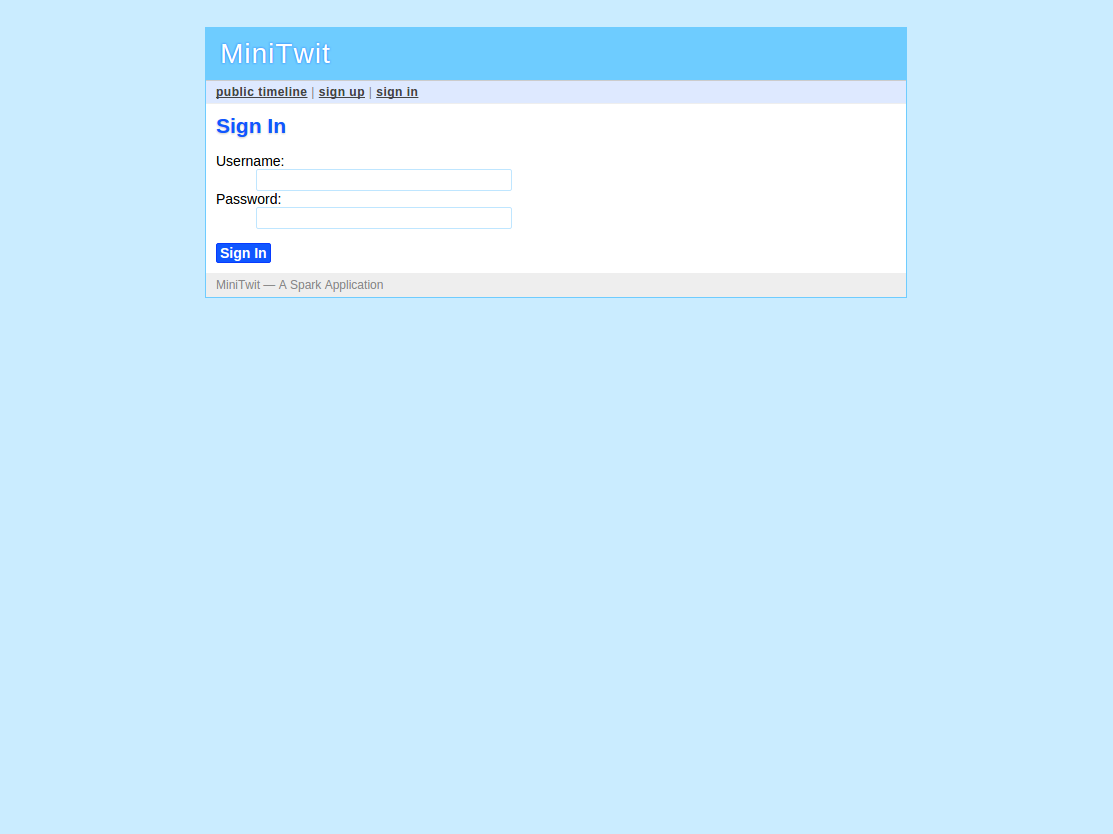
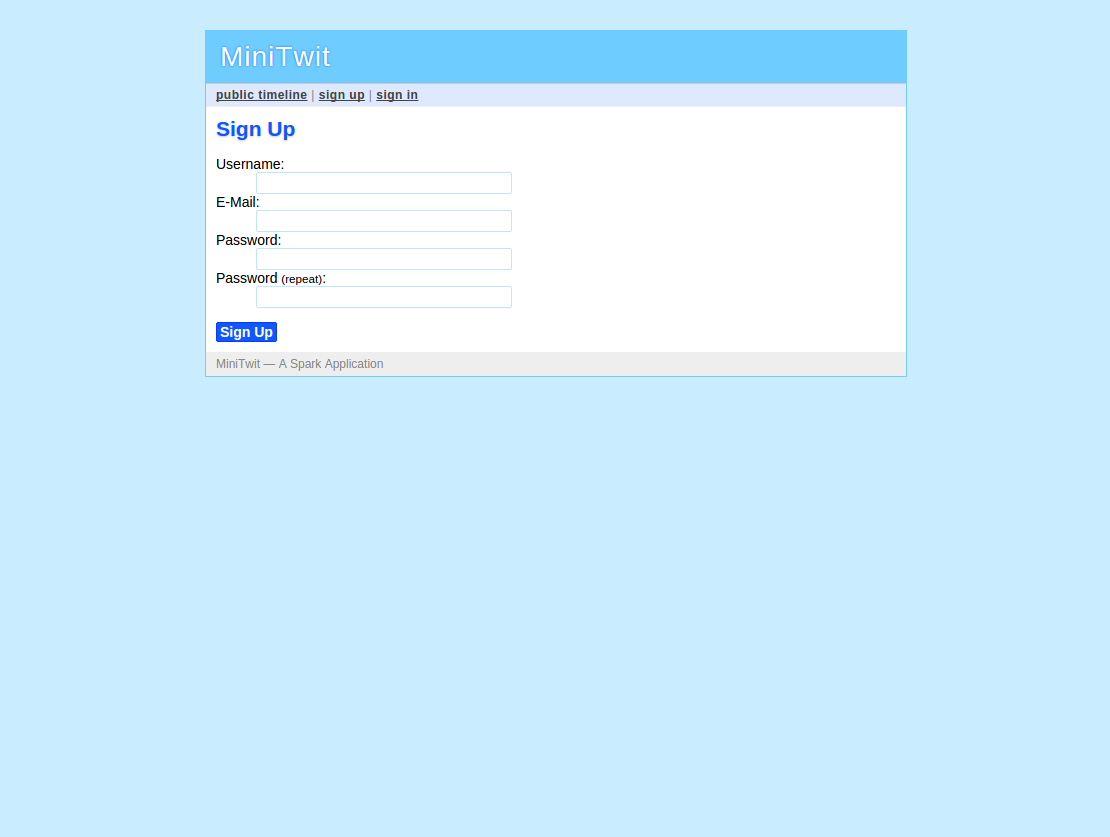
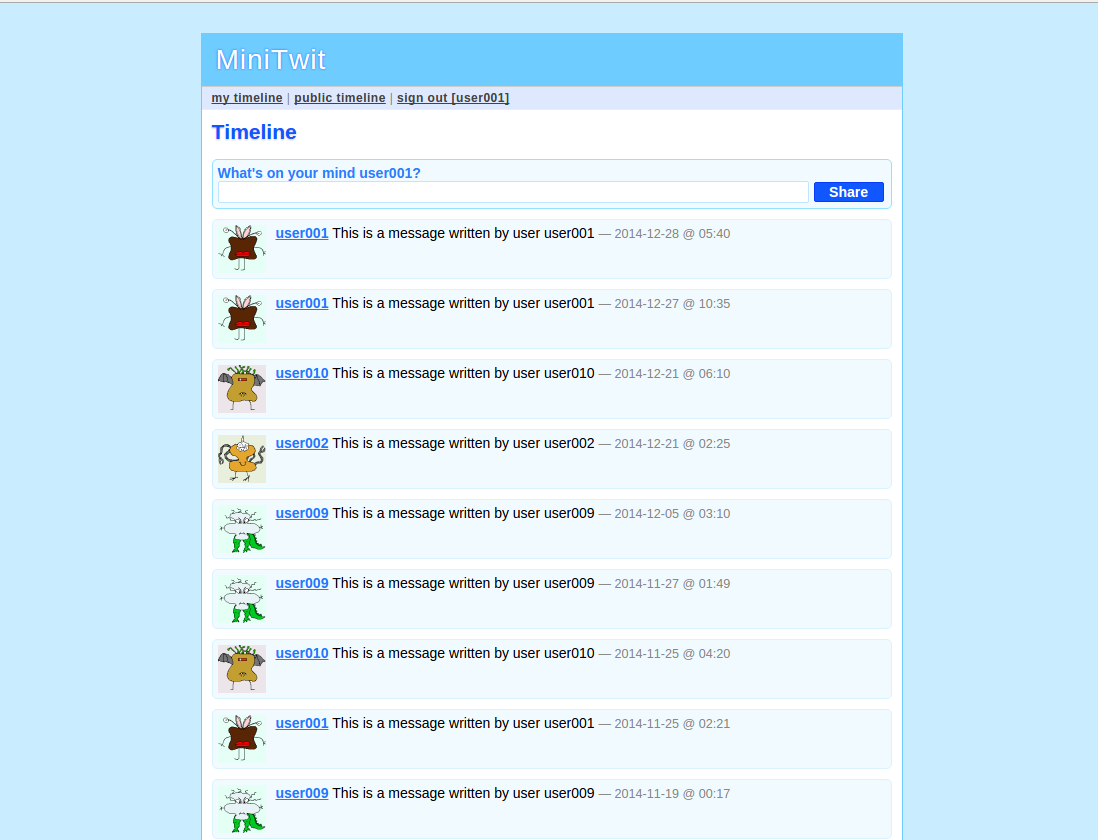
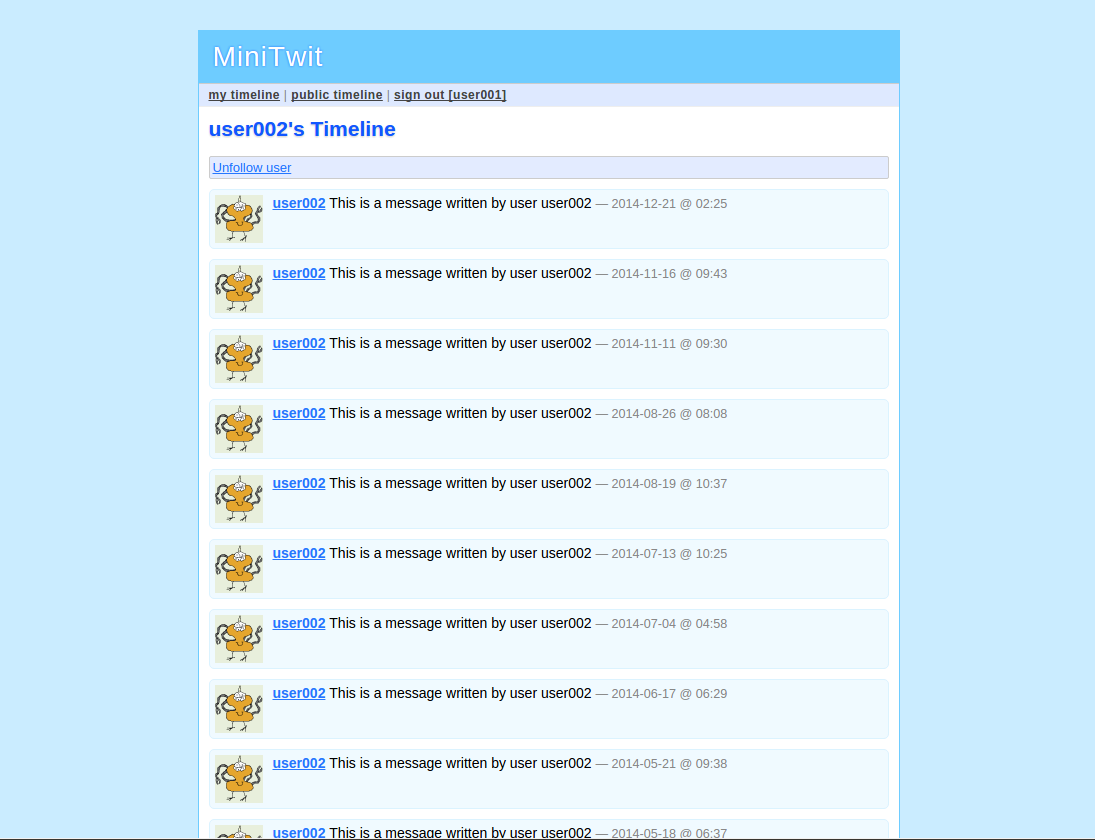
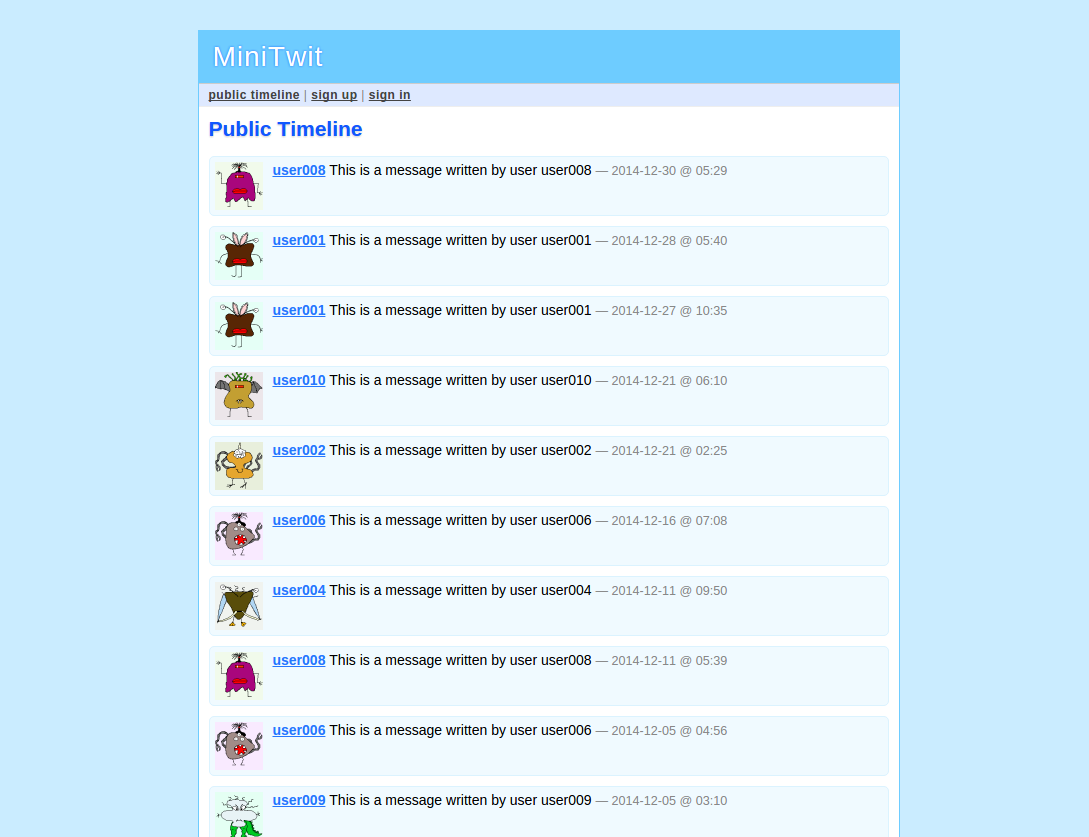
As you can see, this is a very simple application.
One nice feature is that it’s also very easy to run. You only need two things installed:
- Java 8
- Maven 3
Just clone or download the repository on GitHub, go to the root directory, and execute the following Maven command:
mvn compile exec:javaThen, open your browser at http://localhost:4557.
The application uses an embedded in-memory database, meaning that everything you do is not persisted after the application is terminated. The advantage is that you don’t need a database installed to run the application, and in the way the code is structured, it can be changed to use any other relational database easily (more on this later).
The database has some dummy users and messages already inserted. You can use user001/user001 as a user/password combination to log into the application, or user002/user002, or user003/user003 until user010/user010, or sign up yourself. If your e-mail address has an associated Gravatar image, this will be used as your profile image.
You can go and try it now to learn more about how the application works.
Ready?
Now let’s dive into the technical part.
Code Organization
The code is organized into the following packages:
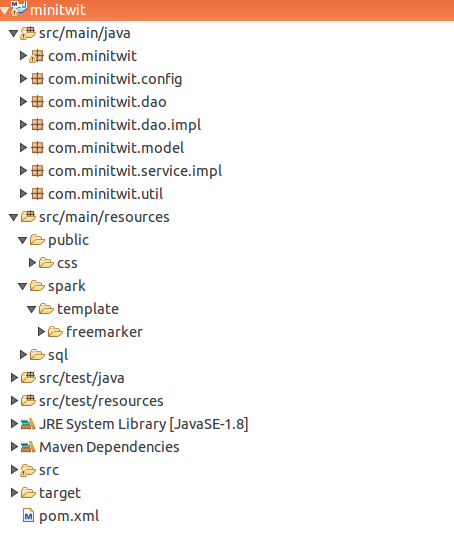
-
src/main/java
-
com.minitwit
Base package, contains the main class of the application. -
com.minitwit.config
Contains the classes that set up the database and web routes. -
com.minitwit.dao
Contains the interfaces that define the functionality to access the database using the Data Access Object (DAO) pattern. -
com.minitwit.dao.impl
Contains the classes that implement the functionality to access the HSQLDB database. -
com.minitwit.model
Contains the POJO classes that represent the model of the application. -
com.minitwit.service.impl
Contains the class that acts as a facade to access the DAOs from the presentation layer. -
com.minitwit.util
Contains utility classes for password hashes and Gravatar images.
-
-
src/main/resources
-
public
Contains the static files used by the web application (currently, only the CSS style sheet). -
spark/template/freemarker
Contains the Freemarker templates -
sql
Contains the SQL initialization scripts for the database.
-
Now that we know how the code is structured, let’s see how the project is set up with Maven.
pom.xml
Let’s start by listing the project’s dependencies (the latest versions at the time of the project creation were used):
- Java 8. The latest version of Spark runs on Java 8.
- Spark 2.2. Web microframework.
- Spark Freemarker 2.3.23. Library that handles the integration between Spark and Freemarker.
- Spring 4.2.0. Used for dependency injection and as a JDBC framework.
- HSQLDB 2.3.3. Used as a database.
- DBCP 2.1.1. Used for the pool connection to the database.
- jBCrypt 0.4. Used to hash the user’s password.
- Commons Bean Utils 1.9.2. Used to populate a POJO model from a map of request parameters.
It’s a good practice to keep the dependency versions as properties so they can be easily changed or for the case that more than one library of the same project uses the same version (like Spring for example).
So here are the properties:
<properties>
    <jdk.version>1.8</jdk.version>
    <spark.version>2.2</spark.version>
    <spark.freemarker.version>2.0.0</spark.freemarker.version>
    <freemarker.version>2.3.23</freemarker.version>
    <spring.version>4.2.0.RELEASE</spring.version>
    <hsqldb.version>2.3.3</hsqldb.version>
    <dbcp.version>2.1.1</dbcp.version>
    <jbcrypt.version>0.4</jbcrypt.version>
    <commons.beanutils.version>1.9.2</commons.beanutils.version>
</properties>
And here are the dependencies:
<dependencies>
    <!-- Spark Java -->
    <dependency>
        <groupId>com.sparkjava</groupId>
        <artifactId>spark-core</artifactId>
        <version>${spark.version}</version>
    </dependency>

    <!-- Spark Freemarker -->
    <dependency>
        <groupId>com.sparkjava</groupId>
        <artifactId>spark-template-freemarker</artifactId>
        <version>${spark.freemarker.version}</version>
    </dependency>

    <!-- Freemarker -->
    <dependency>
        <groupId>org.freemarker</groupId>
        <artifactId>freemarker</artifactId>
        <version>${freemarker.version}</version>
    </dependency>

    <!-- Spring Core -->
    <dependency>
        <groupId>org.springframework</groupId>
        <artifactId>spring-core</artifactId>
        <version>${spring.version}</version>
    </dependency>

    <!-- Spring Context -->
    <dependency>
        <groupId>org.springframework</groupId>
        <artifactId>spring-context</artifactId>
        <version>${spring.version}</version>
    </dependency>

    <!-- Spring JDBC -->
    <dependency>
        <groupId>org.springframework</groupId>
        <artifactId>spring-jdbc</artifactId>
        <version>${spring.version}</version>
    </dependency>

    <!-- HyperSQL DB -->
    <dependency>
        <groupId>org.hsqldb</groupId>
        <artifactId>hsqldb</artifactId>
        <version>${hsqldb.version}</version>
    </dependency>

    <!--  Connection pool -->
    <dependency>
        <groupId>org.apache.commons</groupId>
        <artifactId>commons-dbcp2</artifactId>
        <version>${dbcp.version}</version>
    </dependency>

    <!-- Password hashes -->
    <dependency>
        <groupId>de.svenkubiak</groupId>
        <artifactId>jBCrypt</artifactId>
        <version>${jbcrypt.version}</version>
    </dependency>

    <!-- Populate bean from request -->
    <dependency>
        <groupId>commons-beanutils</groupId>
        <artifactId>commons-beanutils</artifactId>
        <version>${commons.beanutils.version}</version>
    </dependency>
</dependencies>
Now let’s configure two plugins.
The first is to ensure that Maven compiles and runs the application using Java 8. This is done with the maven-compiler-plugin.
The second plugin will be used to easily run the application from the command line. We can execute any Java class with Maven by using the following command:
mvn exec:java -Dexec.mainClass="com.example.MainClass" -Dexec.args="arg0 arg1 arg2"As you can see, to use this command, you should know the package and name of the class to execute as well as the parameters it takes. Hopefully, you can declare this information in the pom.xml file with exec-maven-plugin, so you can run the program with just:
mvn exec:javaSo this is how it looks the plugin section of the pom.xml file:
<build>
    <plugins>
        <plugin>
            <groupId>org.apache.maven.plugins</groupId>
            <artifactId>maven-compiler-plugin</artifactId>
            <configuration>
                <source>${jdk.version}</source>
                <target>${jdk.version}</target>
            </configuration>
        </plugin>

        <plugin>
            <groupId>org.codehaus.mojo</groupId>
            <artifactId>exec-maven-plugin</artifactId>
            <version>1.2.1</version>
            <executions>
                <execution>
                    <goals>
                        <goal>java</goal>
                    </goals>
                </execution>
            </executions>
            <configuration>
                <mainClass>com.minitwit.App</mainClass>
                <arguments></arguments>
            </configuration>
        </plugin>
    </plugins>
</build>
Now let’s take a deeper look to the frameworks used starting with Spring.
Using Spring
Spring is a framework that provides support for dependency injection, transaction management, and data access, among other things, to reduce the “plumbing” required to build Java applications.
Spring manages dependencies through the concept of an Application Context, a sort of a central registry used to manage the life cycle of the objects (beans, in Spring terminology) of an application.
There are two main ways of configuring beans in Spring:
- XML
- Annotations
This application takes the second approach.
The main class (and starting point) is com.minitwit.App:
@Configuration
@ComponentScan({ "com.minitwit" })
public class App {
    public static void main(String[] args) {
    	AnnotationConfigApplicationContext ctx = new AnnotationConfigApplicationContext(App.class);
    	new WebConfig(ctx.getBean(MiniTwitService.class));
        ctx.registerShutdownHook();
    }
}
This class has two important annotations:
@Configuration. This annotation makes theAppclass say to Spring “Hey, I’m a special class, I hold some configuration information for you”.ComponentScan({"com.minitwit"}). This annotation takes as an argument a list of packages where Spring will look for annotated classes to add to its configuration. In this case, there’s just one package,com.minitwit.
Inside the com.minitwit package, we can find the following annotated classes:
- com.minitwit.config.DatabaseConfig:
@Configuration
public class DatabaseConfig {
    @Bean
    public DataSource dataSource() {
        EmbeddedDatabaseBuilder builder = new EmbeddedDatabaseBuilder();
        EmbeddedDatabase db = builder
                .setType(EmbeddedDatabaseType.HSQL)
                .addScript("sql/create-db.sql")
                .addScript("sql/insert-data.sql")
                .build();
        return db;
    }
}
In this class we can find a method annotated with @Bean. This annotation adds the object returned by the method to Spring’s application context, making it available to others beans.
This class configures the datasource for our application. It uses Spring support to use HSQLDB as an embedded database (in-memory database). A good tutorial about Spring embedded databases can be found here. If we were to use another database, this will be the place to configure the access information (datasource) for that other database.
- com.minitwit.service.impl.MiniTwitService:
@Service
public class MiniTwitService {
    @Autowired
    private UserDao userDao;

    @Autowired
    private MessageDao messageDao;

    // Methods...
}
This extract of the class shows two other important annotations, @Service and @Autowired.
Just as @Bean marks a method so it can be used by Spring, @Service marks a class as a “service” to be added to Spring’s application context.
On the other hand, @Autowired is an annotation that tells Spring where to inject an object for you. So instead of coding something like:
private UserDao userDao = new UserDao();
Spring instantiates the object (and its dependencies) and set it for you. This is the concept of dependency injection. Of course, the only requirement is that the objects to be injected are managed by Spring.
- com.minitwit.dao.impl.UserDaoImpl:
@Repository
public class UserDaoImpl implements UserDao {

    private NamedParameterJdbcTemplate template;

    @Autowired
    public UserDaoImpl(DataSource ds) {
        template = new NamedParameterJdbcTemplate(ds);
    }

    // Methods
}
- com.minitwit.dao.impl.MessageDaoImpl:
@Repository
public class MessageDaoImpl implements MessageDao {

    // ...
    private NamedParameterJdbcTemplate template;

    @Autowired
    public MessageDaoImpl(DataSource ds) {
        template = new NamedParameterJdbcTemplate(ds);
    }
    // Methods
}
These classes are based on the DAO pattern to abstract the persistence implementation details in the application. If you want to use another database, or an ORM like Hibernate, just create another implementation of the interfaces com.minitwit.dao.UserDao and com.minitwit.dao.MessageDao.
Also, these classes are annotated with @Repository instead of @Service. @Repository is recommended for any class that fulfills the role of a DAO or a repository. Spring uses @Component as a generic stereotype for any managed component. @Repository (for persistence layer classes), @Service (for services), and @Controller (for the presentation layer) are specializations of @Component.
Going back to com.minitwit.App, the main method creates a Spring application context of type AnnotationConfigApplicationContext, passing as an argument the App class itself so Spring can read the annotations on this class and scan the package com.minitwit for other classes with Spring annotations:
public static void main(String[] args) {
    AnnotationConfigApplicationContext ctx = new AnnotationConfigApplicationContext(App.class);
    new WebConfig(ctx.getBean(MiniTwitService.class));
    ctx.registerShutdownHook();
}
The next line creates an instance of com.minitwit.config.WebConfig (which holds the web routes configuration) passing as an argument a bean of type MiniTwitService. This bean has dependencies to the DAOs that in turn depend on the datasource to HSQLDB to work. As you can see, with some simple annotations, Spring creates all these dependencies for us, making the code simpler.
At some point, the application context has to be closed. We can’t just close it at this point with something like ctx.close(), because the access to the in-memory database will be lost (remember it was created through the Spring embedded database classes).
Luckely, there’s a method, registerShutdownHook(), that register a shutdown hook with the JVM runtime, closing this context on JVM shutdown (when we close or terminate the program). This is perfect for an application that just waits to listen for connections until is terminated, like this one.
This class is just the starting point of the application. The best part is what happens inside com.minitwit.config.WebConfig.
Spark
com.minitwit.config.WebConfig holds the web routes configuration.
Its constructor takes an instance of com.minitwit.service.impl.MiniTwitService that is used to execute the business logic of the application:
public WebConfig(MiniTwitService service) {
    this.service = service;
    staticFileLocation("/public");
    setupRoutes();
}
MiniTwitService is stateless (it doesn’t store any client state), thus it can be safely saved as an instance variable so it can be shared across all client requests.
In the next line, a static file location (where the CSS style sheet is located) is specified a finally, a method to set up the web routes is called.
The application responds to the following routes:
- /
For authenticated users, it presents the user’s timeline, containing her own messages and the ones from the users she follows. If the user is not authenticated, it’s redirected to the public timeline. - /public
It presents a timeline with messages from all users of the application. - /login
As a get request, it presents the sign in form. If the user is already authenticated, this route redirects to the user’s timeline. As a post request, it performs the actual sign in. - /register
As a get request, it presents the sign up form. If the user is already authenticated, this route redirects to the user’s timeline. As a post request, it performs the actual registration. - /t/:username
It presents the timeline of the given user. If the user doesn’t exist, a 404 status with an error message is returned. - /t/:username/follow
Adds the current (authenticated) user as a follower of the given user. If the user doesn’t exist, a 404 status with an error message is returned. If the user is not authenticated, this route redirects to the login page. - /t/:username/unfollow
Removes the current (authenticated) user as a follower of the given user. If the user doesn’t exist, a 404 status with an error message is returned. If the user is not authenticated, this route redirects to the login page.
Take for example, the route that presents the user’s timeline:
get("/", (req, res) -> {
        User user = getAuthenticatedUser(req);
        Map<String, Object> map = new HashMap<>();
        map.put("pageTitle", "Timeline");
        map.put("user", user);
        List<Message> messages = service.getUserFullTimelineMessages(user);
        map.put("messages", messages);
        return new ModelAndView(map, "timeline.ftl");
}, new FreeMarkerEngine());
First, it gets the authenticated user with a method that just retrieves it from the session:
private User getAuthenticatedUser(Request request) {
    return request.session().attribute(USER_SESSION_ID);
}
Then, it creates a Map that will contain the variables used by the Freemarker template.
Notice how the service is called to get the timeline messages. This service is just a thin facade for the user and message DAOs. For example, here’s the content of the MessageDaoImpl.getUserFullTimelineMessages(User) method:
@Override
public List<Message> getUserFullTimelineMessages(User user) {
    Map<String, Object> params = new HashMap<String, Object>();
    params.put("id", user.getId());

    String sql = "select message.*, user.* from message, user " +
        "where message.author_id = user.user_id and ( " +
        "user.user_id = :id or " +
        "user.user_id in (select followee_id from follower " +
                                    "where follower_id = :id))" +
        "order by message.pub_date desc";
    List<Message> result = template.query(sql, params, messageMapper);

    return result;
}

// Other methods...

private RowMapper<Message> messageMapper = (rs, rowNum) -> {
    Message m = new Message();

    m.setId(rs.getInt("message_id"));
    m.setUserId(rs.getInt("author_id"));
    m.setUsername(rs.getString("username"));
    m.setText(rs.getString("text"));
    m.setPubDate(rs.getTimestamp("pub_date"));
    m.setGravatar(GravatarUtil.gravatarURL(rs.getString("email"), GRAVATAR_DEFAULT_IMAGE_TYPE, GRAVATAR_SIZE));

    return m;
};
Using Spring’s NamedParameterJdbcTemplate class, the query is executed with some parameters passed in a Map. A RowMapper instance creates Message objects from the returned ResultSet.
The schema of the database is actually very simple (it’s located in src/main/resource/sql):
create table user (
  user_id integer primary key GENERATED BY DEFAULT AS IDENTITY(START WITH 100),
  username varchar(50) not null,
  email varchar(50) not null,
  pw varchar(255) not null
);

create table follower (
  follower_id integer,
  followee_id integer
);

create table message (
  message_id integer primary key GENERATED BY DEFAULT AS IDENTITY(START WITH 100),
  author_id integer not null,
  text varchar(160) not null,
  pub_date timestamp
);
One table stores user information, another table stores message information (with a reference to the user’s table), and a third table stores the following relationship between two users.
The user profile image is handled by Gravatar. The com.minitwit.util.GravatarUtil class builds the URL to get the image from the user’s e-mail. You can know more about how this URL is constructed in this link.
Back to the user’s timeline route configuration, in the last step, the map with all the variables is passed to the Freemarker template.
Most routes check if the user is authenticated or if a given user exists, either to redirect to the appropriate page or to send an error. To keep things clean, this is done in a before filter. Here’s an example from the /t/:username/follow route:
before("/t/:username/follow", (req, res) -> {
    String username = req.params(":username");
    User authUser = getAuthenticatedUser(req);
    User profileUser = service.getUserbyUsername(username);
    if(authUser == null) {
        res.redirect("/login");
        halt();
    } else if(profileUser == null) {
        halt(404, "User not Found");
    }
});
First, the code checks if there’s an authenticated user. If there isn’t one, the user is redirected to the login page. Then, it checks if the user to be followed exists. If the user doesn’t exist, an error is returned. Notice that the use of halt() is necessary in both cases to prevent the request to continue to the route handler.
Another example worth mentioning is a POST route. This is the code for the registration handler:
post("/register", (req, res) -> {
    Map<String, Object> map = new HashMap<>();
    User user = new User();
    try {
        MultiMap<String> params = new MultiMap<String>();
        UrlEncoded.decodeTo(req.body(), params, "UTF-8", -1);
        BeanUtils.populate(user, params);
    } catch (Exception e) {
        halt(501);
        return null;
    }
    String error = user.validate();
    if(StringUtils.isEmpty(error)) {
        User existingUser = service.getUserbyUsername(user.getUsername());
        if(existingUser == null) {
            service.registerUser(user);
            res.redirect("/login?r=1");
            halt();
        } else {
            error = "The username is already taken";
        }
    }
    map.put("error", error);
    map.put("username", user.getUsername());
    map.put("email", user.getEmail());
    return new ModelAndView(map, "register.ftl");
}, new FreeMarkerEngine());
One way to access POST parameters in Spark is with the method Request.body(). This method returns a String like the following:
username=user050&email=user@mail.com&password=12345
Fortunately, the jetty server that comes with Spark has a class to parse this type of URLs, UrlEncoded.decodeTo(String, MultiMap, String, int), which takes four parameters:
- The string with the parameters to read
- An instance of
org.eclipse.jetty.util.MultiMap(that extends fromHashMap) where the parameters will be stored - The encoding of the string (most of the times
UTF-8) - The maximum numbers of keys to store in the map (
-1to read them all)
Once the parameters are stored in the map, the method BeanUtils.populate(Object, Map) is used to set the properties of the object from the map. The only restriction is that the keys of the map (the parameters’ name) must be the identical to the property names of the object.
If the object is populated successfully, the next step is to validate the information sent by the user. The knowledge of how to validate the information should be in the model object itself. Here’s the code of the validate() method:
public String validate() {
    String error = null;

    if(StringUtils.isEmpty(username)) {
        error = "You have to enter a username";
    } else if(!EMAIL_ADDRESS_REGEX.matcher(email).matches()) {
        error = "You have to enter a valid email address";
    } else if(StringUtils.isEmpty(password)) {
        error = "You have to enter a password";
    } else if(!password.equals(password2)) {
        error = "The two passwords do not match";
    }

    return error;
}
The only validation that can’t be done inside this method (because it would need a reference to the service and that’s not recommended) is the one about the username already taken:
User existingUser = service.getUserbyUsername(user.getUsername());
if(existingUser == null) {
    service.registerUser(user);
    res.redirect("/login?r=1");
    halt();
} else {
    error = "The username is already taken";
}
If everything is correct, the user is registered and redirected to the sign in page, with a flag set to show a message about the success of the operation.
If there’s an error, a map with the error message and the values entered by the user is sent to the Freemarker template to present this information.
Freemarker
Freemarker is used as the template mechanism to generate the HTML pages of the application.
Thanks to the Spark-Freemarker library, we just have to wrap the template’s parameters into a map and return a ModelAndView object pointing to the template file. For example, here’s the code to present the login page:
get("/login", (req, res) -> {
        Map<String, Object> map = new HashMap<>();
        if(req.queryParams("r") != null) {
            map.put("message", "You were successfully registered and can login now");
        }
        return new ModelAndView(map, "login.ftl");
}, new FreeMarkerEngine());
The application only uses four templates:
- login.ftl
For the login page - register.ftl
For the registration page - timeline.ftl
For the public and user’s timeline pages - masterTemplate.ftl
Contains the main layout of the application
Most web applications use the same layout (for example, a header, a content area, and a footer) for all their pages. It would be impractical to repeat the code of this layout in all the pages (what if something changes? you’d have to replicate this change in all the pages). Many template libraries include some sort of extending or including mechanism so the layout information is contained in just one file.
In the case of Freemarker, it contains an include directive, but it may not be appropiate in all cases. For this kind of job, a combination of the macro and import directives is better suited.
Here’s the content of masterTemplate.ftl:
<#macro masterTemplate title="Welcome">
<!DOCTYPE html
PUBLIC "-//W3C//DTD XHTML 1.0 Transitional//EN"
"http://www.w3.org/TR/xhtml1/DTD/xhtml1-transitional.dtd">
<html xmlns="http://www.w3.org/1999/xhtml">
<head>
<meta http-equiv="Content-Type" content="text/html; charset=UTF-8"></meta>
<title>${title} | MiniTwit</title>
<link rel="stylesheet" type="text/css" href="/css/style.css">
</head>
<body>
<div class="page">
<h1>MiniTwit</h1>
<div class="navigation">
<#if user??>
<a href="/">my timeline</a> |
<a href="/public">public timeline</a> |
<a href="/logout">sign out [${user.username}]</a>
<#else>
<a href="/public">public timeline</a> |
<a href="/register">sign up</a> |
<a href="/login">sign in</a>
</#if>
</div>
<div class="body">
<#nested />
</div>
<div class="footer">
MiniTwit — A Spark Application
</div>
</div>
</body>
</html>
</#macro>
A macro defines a template fragment that allows parameters with default values (like ${title}) that can be used as a user-defined directive. It can contain a nested element that will be executed in the context where the macro is called.
To use this master template, we have to import it with the import directive and provide the content that will be replaced by the nested element. For example, here’s the content of login.ftl:
<#import "masterTemplate.ftl" as layout />

<@layout.masterTemplate title="Sign In">
    <h2>Sign In</h2>
    <#if message??>
    	<div class="success">
    		${message}
    	</div>
    </#if>
    <#if error??>
    	<div class="error">
    		<strong>Error:</strong> ${error}
    	</div>
    </#if>
    <form action="/login" method="post">
	   <dl>
	     <dt>Username:
	     <dd><input type="text" name="username" size="30" maxlength="50" value="${username!}">
	     <dt>Password:
	     <dd><input type="password" name="password" size="30">
	   </dl>
	   <div class="actions"><input type="submit" value="Sign In"></div>
	 </form>
</@layout.masterTemplate>
See how the master template is imported and referenced with the identifier layout, and how the value of the title parameter is provided.
The HTML generated by this user-directive will be placed where the master template defines the nested element:
...
</div>
<div class="body">
    <#nested />
</div>
<div class="footer">
...
Conclusion
Now you know how the internals of the application work.
I hope this overview had helped you to understand how to integrate frameworks like Spring and Freemarker with Spark to build a complete web application. I’m sure you can now make modifications (like message pagination or using another database) by yourself without trouble.
I tried to follow good development practices, but this application shows only one approach to develop a web application with Spark. It may not be the simplest one (after all, the original minitwit was made in just one file, which is also possible to do with the Spark framework) but it is flexible and can be tested easily.
In the end, I hope this tutorial can serve as a starting point for your web development issues. Have fun!